A lot of people use the SELECT SINGLE statement to check for the existence of a value in a database.
Other people prefer to use the 'UP TO 1 ROWS' variant of the SELECT statement.
SELECT SINGLE:
Select single statement only selects the first record of any series of records from a database table.
That means this statement can read a single record from a database table that fulfils the 'WHERE' clause.
If this results in multiple records then only the first one will be returned and therefore may not be unique.
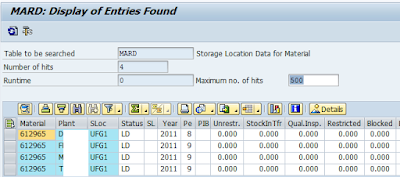
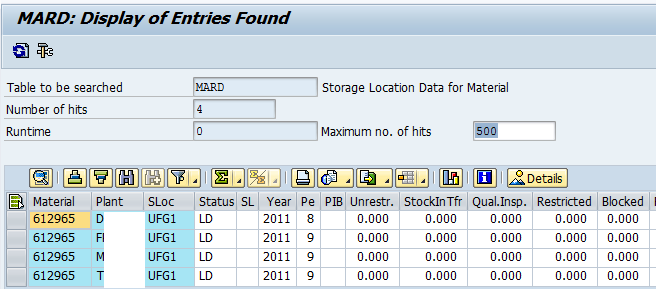
In below example we are fetching records of material, plant, storage location and unrestricted(quantity) from table MARD where material no is 612965 .
The database contains only 4 items for this Material no.
Example.
REPORT ZTEST9 NO STANDARD PAGE HEADING
LINE-SIZE 120.
TABLES: MARD.
TYPES: BEGIN OF TY_MARD,
MATNR LIKE MARD-MATNR,
WERKS LIKE MARD-WERKS,
LGORT LIKE MARD-LGORT,
LABST LIKE MARD-LABST,
END OF TY_MARD.
DATA : WA_MARD TYPE TY_MARD.
START-OF-SELECTION.
PERFORM GET_DATA.
*----------------------------------------------------------------------*
* TOP-OF-PAGE
*----------------------------------------------------------------------*
TOP-OF-PAGE.
PERFORM BUILD_PAGE_HEADER.
END-OF-SELECTION.
PERFORM SHOW_LIST.
*&---------------------------------------------------------------------*
*& Form GET_DATA
*&---------------------------------------------------------------------*
* text
*----------------------------------------------------------------------*
FORM GET_DATA.
SELECT SINGLE MATNR
WERKS
LGORT
LABST FROM MARD INTO WA_MARD WHERE MATNR = '000000000000612965'.
ENDFORM. " GET_DATA
*&---------------------------------------------------------------------*
*& Form BUILD_PAGE_HEADER
*&---------------------------------------------------------------------*
* text
*----------------------------------------------------------------------*
FORM BUILD_PAGE_HEADER .
FORMAT INTENSIFIED ON COLOR COL_HEADING.
ULINE AT (105).
WRITE:/ SY-VLINE,
'Material No',
20 SY-VLINE,
'Plant',
50 SY-VLINE,
'Str.Loc',
80 SY-VLINE,
'Qty',
105 SY-VLINE.
ULINE AT (105).
FORMAT RESET.
ENDFORM. " BUILD_PAGE_HEADER
*&---------------------------------------------------------------------*
*& Form SHOW_LIST
*&---------------------------------------------------------------------*
* text
*----------------------------------------------------------------------*
FORM SHOW_LIST .
WRITE:/ SY-VLINE,
WA_MARD-MATNR,
20 SY-VLINE,
WA_MARD-WERKS,
50 SY-VLINE,
WA_MARD-LGORT,
80 SY-VLINE,
WA_MARD-LABST,
105 SY-VLINE.
ULINE AT (105).
ENDFORM. " SHOW_LIST
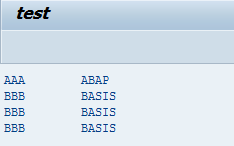
output

SELECT UP TO 1 ROWS:
The 'SELECT -- UP TO 1 ROWS' statement is selects all of the relevant records that are defined by the WHERE clause,
applies any aggregate, ordering or grouping functions to them and then returns the first record of the result set.
example.
here i write same code for select up to 1 rows with order by .
REPORT ZTEST9 NO STANDARD PAGE HEADING
LINE-SIZE 120.
TABLES: MARD.
TYPES: BEGIN OF TY_MARD,
MATNR LIKE MARD-MATNR,
WERKS LIKE MARD-WERKS,
LGORT LIKE MARD-LGORT,
LABST LIKE MARD-LABST,
END OF TY_MARD.
DATA : WA_MARD TYPE TY_MARD.
START-OF-SELECTION.
PERFORM GET_DATA.
*----------------------------------------------------------------------*
* TOP-OF-PAGE
*----------------------------------------------------------------------*
TOP-OF-PAGE.
PERFORM BUILD_PAGE_HEADER.
END-OF-SELECTION.
PERFORM SHOW_LIST.
*&---------------------------------------------------------------------*
*& Form GET_DATA
*&---------------------------------------------------------------------*
* text
*----------------------------------------------------------------------*
FORM GET_DATA.
SELECT MATNR
WERKS
LGORT
LABST UP TO 1 ROWS FROM MARD INTO WA_MARD
WHERE MATNR = '000000000000612965'
ORDER BY WERKS DESCENDING.
ENDSELECT.
ENDFORM. " GET_DATA
*&---------------------------------------------------------------------*
*& Form BUILD_PAGE_HEADER
*&---------------------------------------------------------------------*
* text
*----------------------------------------------------------------------*
FORM BUILD_PAGE_HEADER .
FORMAT INTENSIFIED ON COLOR COL_HEADING.
ULINE AT (105).
WRITE:/ SY-VLINE,
'Material No',
20 SY-VLINE,
'Plant',
50 SY-VLINE,
'Str.Loc',
80 SY-VLINE,
'Qty',
105 SY-VLINE.
ULINE AT (105).
FORMAT RESET.
ENDFORM. " BUILD_PAGE_HEADER
*&---------------------------------------------------------------------*
*& Form SHOW_LIST
*&---------------------------------------------------------------------*
* text
*----------------------------------------------------------------------*
FORM SHOW_LIST .
WRITE:/ SY-VLINE,
WA_MARD-MATNR,
20 SY-VLINE,
WA_MARD-WERKS,
50 SY-VLINE,
WA_MARD-LGORT,
80 SY-VLINE,
WA_MARD-LABST,
105 SY-VLINE.
ULINE AT (105).
ENDFORM. " SHOW_LIST
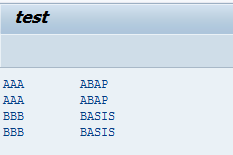
output

Other people prefer to use the 'UP TO 1 ROWS' variant of the SELECT statement.
SELECT SINGLE:
Select single statement only selects the first record of any series of records from a database table.
That means this statement can read a single record from a database table that fulfils the 'WHERE' clause.
If this results in multiple records then only the first one will be returned and therefore may not be unique.
In below example we are fetching records of material, plant, storage location and unrestricted(quantity) from table MARD where material no is 612965 .
The database contains only 4 items for this Material no.
Example.
REPORT ZTEST9 NO STANDARD PAGE HEADING
LINE-SIZE 120.
TABLES: MARD.
TYPES: BEGIN OF TY_MARD,
MATNR LIKE MARD-MATNR,
WERKS LIKE MARD-WERKS,
LGORT LIKE MARD-LGORT,
LABST LIKE MARD-LABST,
END OF TY_MARD.
DATA : WA_MARD TYPE TY_MARD.
START-OF-SELECTION.
PERFORM GET_DATA.
*----------------------------------------------------------------------*
* TOP-OF-PAGE
*----------------------------------------------------------------------*
TOP-OF-PAGE.
PERFORM BUILD_PAGE_HEADER.
END-OF-SELECTION.
PERFORM SHOW_LIST.
*&---------------------------------------------------------------------*
*& Form GET_DATA
*&---------------------------------------------------------------------*
* text
*----------------------------------------------------------------------*
FORM GET_DATA.
SELECT SINGLE MATNR
WERKS
LGORT
LABST FROM MARD INTO WA_MARD WHERE MATNR = '000000000000612965'.
ENDFORM. " GET_DATA
*&---------------------------------------------------------------------*
*& Form BUILD_PAGE_HEADER
*&---------------------------------------------------------------------*
* text
*----------------------------------------------------------------------*
FORM BUILD_PAGE_HEADER .
FORMAT INTENSIFIED ON COLOR COL_HEADING.
ULINE AT (105).
WRITE:/ SY-VLINE,
'Material No',
20 SY-VLINE,
'Plant',
50 SY-VLINE,
'Str.Loc',
80 SY-VLINE,
'Qty',
105 SY-VLINE.
ULINE AT (105).
FORMAT RESET.
ENDFORM. " BUILD_PAGE_HEADER
*&---------------------------------------------------------------------*
*& Form SHOW_LIST
*&---------------------------------------------------------------------*
* text
*----------------------------------------------------------------------*
FORM SHOW_LIST .
WRITE:/ SY-VLINE,
WA_MARD-MATNR,
20 SY-VLINE,
WA_MARD-WERKS,
50 SY-VLINE,
WA_MARD-LGORT,
80 SY-VLINE,
WA_MARD-LABST,
105 SY-VLINE.
ULINE AT (105).
ENDFORM. " SHOW_LIST
output

SELECT UP TO 1 ROWS:
The 'SELECT -- UP TO 1 ROWS' statement is selects all of the relevant records that are defined by the WHERE clause,
applies any aggregate, ordering or grouping functions to them and then returns the first record of the result set.
example.
here i write same code for select up to 1 rows with order by .
REPORT ZTEST9 NO STANDARD PAGE HEADING
LINE-SIZE 120.
TABLES: MARD.
TYPES: BEGIN OF TY_MARD,
MATNR LIKE MARD-MATNR,
WERKS LIKE MARD-WERKS,
LGORT LIKE MARD-LGORT,
LABST LIKE MARD-LABST,
END OF TY_MARD.
DATA : WA_MARD TYPE TY_MARD.
START-OF-SELECTION.
PERFORM GET_DATA.
*----------------------------------------------------------------------*
* TOP-OF-PAGE
*----------------------------------------------------------------------*
TOP-OF-PAGE.
PERFORM BUILD_PAGE_HEADER.
END-OF-SELECTION.
PERFORM SHOW_LIST.
*&---------------------------------------------------------------------*
*& Form GET_DATA
*&---------------------------------------------------------------------*
* text
*----------------------------------------------------------------------*
FORM GET_DATA.
SELECT MATNR
WERKS
LGORT
LABST UP TO 1 ROWS FROM MARD INTO WA_MARD
WHERE MATNR = '000000000000612965'
ORDER BY WERKS DESCENDING.
ENDSELECT.
ENDFORM. " GET_DATA
*&---------------------------------------------------------------------*
*& Form BUILD_PAGE_HEADER
*&---------------------------------------------------------------------*
* text
*----------------------------------------------------------------------*
FORM BUILD_PAGE_HEADER .
FORMAT INTENSIFIED ON COLOR COL_HEADING.
ULINE AT (105).
WRITE:/ SY-VLINE,
'Material No',
20 SY-VLINE,
'Plant',
50 SY-VLINE,
'Str.Loc',
80 SY-VLINE,
'Qty',
105 SY-VLINE.
ULINE AT (105).
FORMAT RESET.
ENDFORM. " BUILD_PAGE_HEADER
*&---------------------------------------------------------------------*
*& Form SHOW_LIST
*&---------------------------------------------------------------------*
* text
*----------------------------------------------------------------------*
FORM SHOW_LIST .
WRITE:/ SY-VLINE,
WA_MARD-MATNR,
20 SY-VLINE,
WA_MARD-WERKS,
50 SY-VLINE,
WA_MARD-LGORT,
80 SY-VLINE,
WA_MARD-LABST,
105 SY-VLINE.
ULINE AT (105).
ENDFORM. " SHOW_LIST
output